

Is the Samsung Galaxy S26 Ultra Worth the Upgrade over the iPhone 17 Pro?
February 27, 2026
Cloud Computing vs. On-Premises: Why Proxmox is Winning in 2026
March 3, 2026The Ultimate Visual Guide to Installing a VM in Microsoft Azure

Getting your first Virtual Machine (VM) up and running is a major milestone for anyone diving into cloud computing. However, looking at the Microsoft Azure portal for the first time can feel like staring at the control panel of a spaceship. Don’t worry—it’s much simpler than it looks.
Think of a Virtual Machine as a computer running inside another computer, located in one of Microsoft’s massive data centers. Whether you are a student building a test lab, a developer needing a Linux environment, or just someone wanting to experiment with Windows/linux, Azure makes it incredibly easy to get a machine up and running in minutes.
In this visual guide, we are going to cut through the cloud jargon. Using step-by-step screenshots right from the Azure portal, we will walk through exactly how to provision, configure, and connect to your very first Windows or Linux Virtual Machine.
By the end of this tutorial, you will have your own cloud server live on the internet. Let’s get started!
Prerequisites
Before we jump into the portal, make sure you have a few basic things ready:
- An Active Microsoft Azure Account: You need an account to build resources. If you don’t have one, Microsoft offers a generous free tier. Student Tip: Be sure to look up “Azure for Students” you can get free credits and access to popular services.
- A Goal for Your Lab: Decide whether your project requires a Windows environment (which you’ll connect to via a graphical Remote Desktop) or a Linux environment (which you’ll connect to via a text-based Secure Shell, or SSH). We will cover how to select either option.
- A Few Minutes of Time: The actual setup takes less than five minutes, and the deployment usually finishes in under ten.
Step 1: Navigating to Virtual Machines
The Azure Portal is packed with hundreds of services, but finding the Virtual Machine section is incredibly straightforward.
- Head over to azure.com and log in with your Microsoft account.
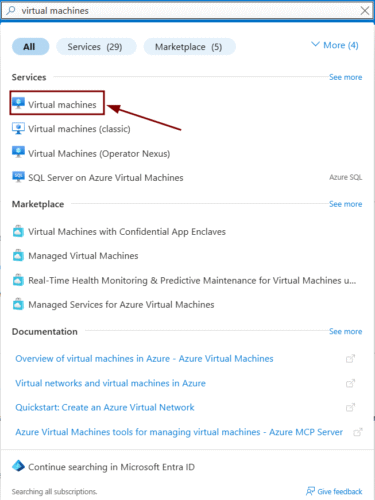
- Once you are on the homepage, look at the top search bar.
- Type Virtual machines into the search bar and click on the matching service (it has a blue computer icon). Alternatively, you might see the “Virtual machines” icon sitting right there under the “Azure services” section on your dashboard.
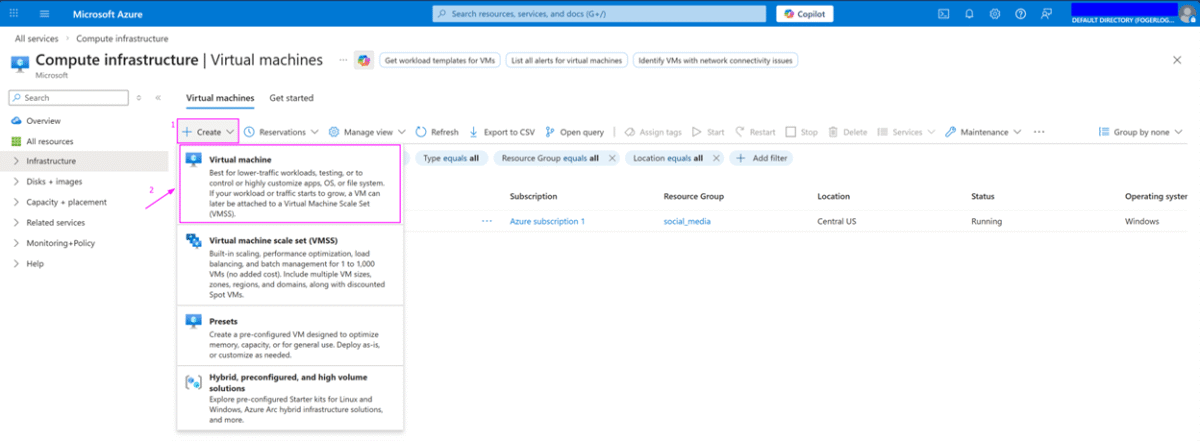
4. On the Virtual Machines page, click the blue Create button (usually near the top left), and select Azure virtual machine from the dropdown menu.
Step 2: Configuring the “Basics” Tab
You are now looking at the “Create a virtual machine” wizard. This screen can look a bit overwhelming, but for a lab environment, we only need to focus on a few key settings.
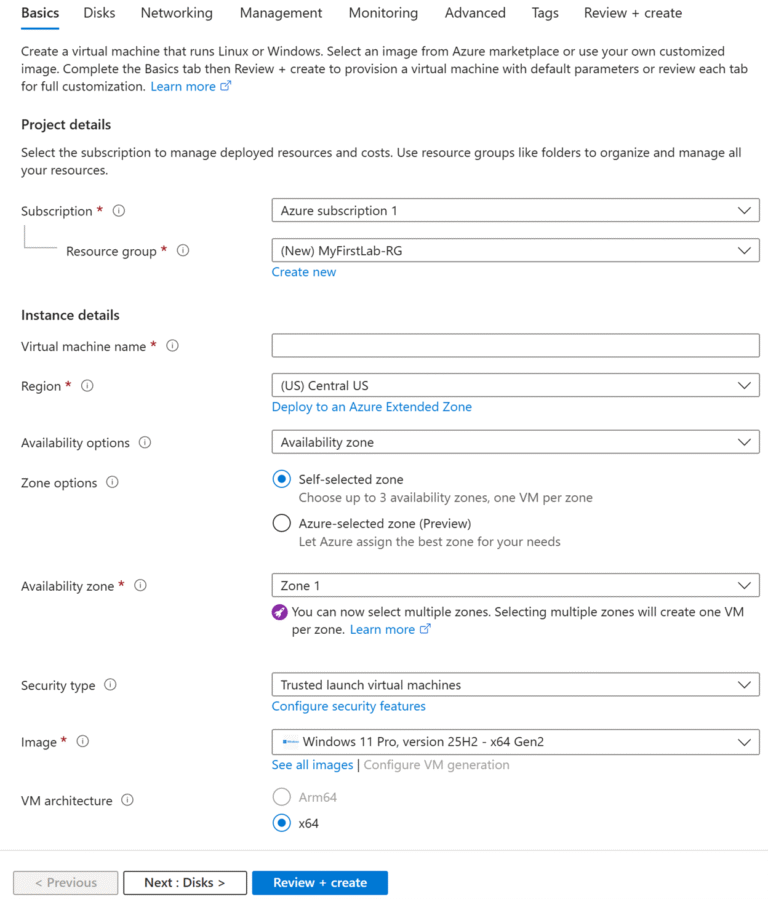
First, let’s look at the Project Details:
- Subscription: This is the billing account paying for the VM. If you are a student, ensure your “Azure for Students” or free tier subscription is selected here.
- Resource group: Think of a resource group as a folder on your computer. It holds all the different pieces of your project together. Click Create new and name it something recognizable, like MyFirstLab-RG
Next, we move down to the Instance details:
- Virtual machine name: Give your machine a name! (e.g., Lab-Web-Server or Test-Win-VM).
- Region: Choose a location that is geographically closest to you for the best performance.
- Availability options: For a simple student lab, leave this as “No infrastructure redundancy required.”
- Security type: Leave the default “Trusted launch virtual machines” selected.
- Image: This is the most important part! This is where you choose your operating system. Click the dropdown menu.
- If you want a Linux lab, select Ubuntu Server.
- If you want a Windows lab, select Windows Server 2022 Datacenter.
- Size: Azure will suggest a default size, but it might be too expensive for a simple lab. Click “See all sizes” and look for a “B-series” machine (like Standard_B1s or Standard_B2s). These are “burstable” VMs and are incredibly cost-effective for students and testing.
Step 3: Setting Up the Administrator Account
Scroll down slightly on the “Basics” tab. This is where you create the “keys” to your new server. Without this, you won’t be able to log in.
For Linux VMs: You have a choice between an SSH public key (highly secure, standard for cloud engineers) or a Password (easier for absolute beginners). For a quick student lab, selecting “Password” is perfectly fine and gets you moving faster. Enter your desired username and password.
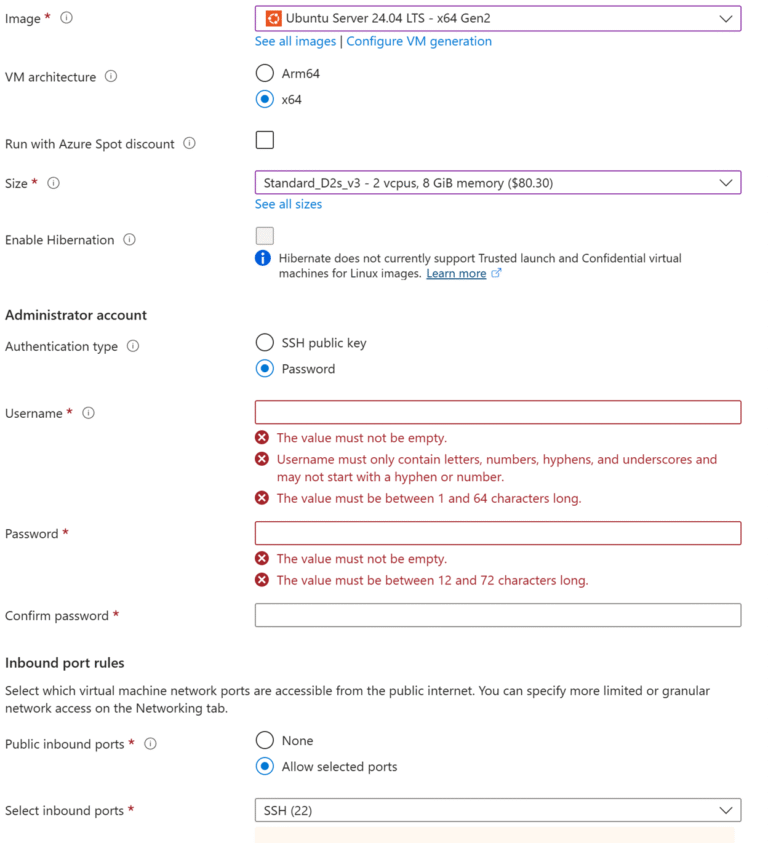
For Windows VMs: You will only have the option to use a Password. Enter a username (like labadmin) and a strong, complex password. Write this down—Microsoft cannot recover this password for you!
Step 4: Opening the Right Ports (Inbound Port Rules)
Right below the administrator account section, you will see “Inbound port rules.” This step is incredibly important: if you don’t open the right “door” (port) in Azure’s firewall, you will be permanently locked out of the VM you just built!
- Under “Public inbound ports,” make sure Allow selected ports is chosen.
- Click the “Select inbound ports” dropdown menu.
- For a Windows VM: Check the box for RDP (3389). This allows you to use Remote Desktop.
- For a Linux VM: Check the box for SSH (22). This allows you to use your terminal to connect.
A quick note for students: You will likely see a yellow warning banner about leaving ports open to the internet. For a temporary learning lab, this is perfectly fine. In a real-world corporate environment, you would use advanced security tools to lock this down.
Once your ports are selected, click the blue Review + create button at the very bottom of the screen. For a basic lab, Azure’s default settings for Disks, Networking, and Management are exactly what you need, so we can skip straight to the end!

Step 5: Review and Create
After clicking Review + create, Azure will run a quick background check to ensure you haven’t missed any required fields.
- At the top of the screen, you should see a green bar that says Validation passed. If you see a red error, don’t panic just click back to the “Basics” tab and double-check that you filled in a VM name and username/password.
- Take a quick look at the Pricing section. Azure will show you an estimated cost per hour. For student labs using a B-series size, this is usually just a few cents an hour.
- Once you are happy, click the blue Create button at the bottom left.
Azure will now start building your virtual machine! You will see a “Deployment is in progress” screen. This usually takes about 2 to 5 minutes. Grab a sip of water, and wait for the screen to update to Your deployment is complete.
Step 6: Connecting to Your New VM
Congratulations, your VM is officially live in the cloud! Click the Go to resource button on the deployment success screen to open your VM’s main dashboard.
Here is how to log in based on the operating system you chose:
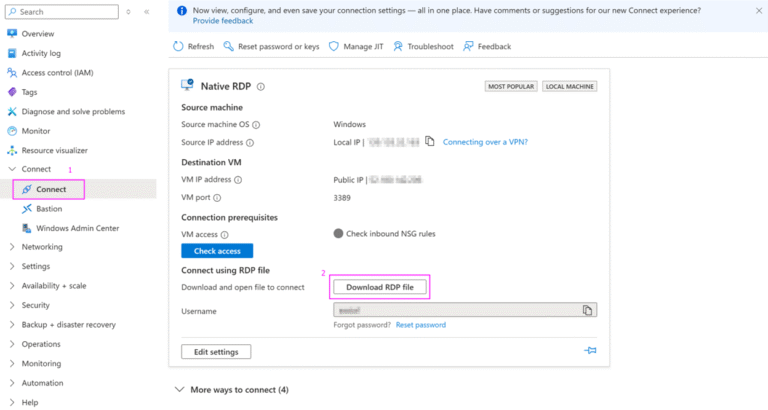
Connecting to a Windows VM (via RDP):
- On your VM’s Overview page, look for the Public IP address on the right side.
- Click the Connect button at the top of the page, and select RDP from the dropdown menu.
- Click Download RDP File and open the file that downloads to your computer.
- Your computer will ask for credentials. Click “More choices” -> “Use a different account.”
- Enter the exact username and password you created back in Step 3, and click OK. Accept any certificate warnings, and you will see your new Windows desktop appear!
Connecting to a Linux VM (via SSH):
- On your VM’s Overview page, find your Public IP address and copy it.
- Open a terminal on your computer (Command Prompt or PowerShell on Windows, or Terminal on Mac/Linux).
- Type the following command, replacing username with the one you made in Step 3, and your_IP_address with the one you just copied:
ssh username@your_IP_address
(Example: ssh labadmin@203.0.113.5)
- Press Enter. It will ask if you are sure you want to continue connecting; type yes and press Enter.
- Finally, type in your password (the cursor will not move while you type, this is normal for security!) and press Enter. You are now logged into your Linux server!
Conclusion & Clean-Up (The Golden Rule of Cloud Labs)
Congratulations! You have successfully deployed and connected to a virtual machine in the cloud. Whether you spun up Windows or Linux, you have just mastered the foundational skill for almost everything else you will do in Azure.
However, before you close your browser, there is one final, critical lesson for any student or beginner: Clean up your environment.
Cloud computing operates on a pay-as-you-go model. If your VM is running, it is consuming your free credits or charging your account. When you are finished experimenting for the day, you generally have two options:
- Stop the VM: If you plan to use this exact server again tomorrow, simply click the Stop button on your VM’s overview page. This fully shuts down the computer so you aren’t charged for the computing power (though you will still use a tiny fraction of a cent for the storage disk holding your data).
- Delete Everything (Recommended for Labs): If you are completely done with this specific tutorial or experiment, the safest way to avoid surprise charges is to delete the entire “Resource Group” you created back in Step 2. This acts like a digital trash can, neatly wiping out the VM, the network, and the hard drives all at once so you are billed nothing further.
Happy cloud building!
I hope this visual guide helped demystify the Azure portal and get your first virtual machine running smoothly! Cloud computing can feel overwhelming at first, but taking it step-by-step is the best way to learn.
If you get stuck on any of these steps, need advice on sizing your student lab, or have requests for future cloud tutorials, do not hesitate to reach out. Drop me a message on my page, and I’d be happy to help you troubleshoot!