

How security of WhatsApp can be compromised?
May 14, 2025
Google Becomes Latest Victim in Massive Salesforce Data Breach
August 10, 2025
In today’s digital landscape, virtual machines (VMs) have become indispensable tools for developers, IT professionals, and even home lab enthusiasts. They offer a flexible and efficient way to run multiple operating systems on a single physical machine, saving hardware costs and simplifying management. Among the many virtualization platforms available, Proxmox Virtual Environment stands out as a powerful, open-source solution that combines KVM (Kernel-based Virtual Machine) and LXC (Linux Containers) virtualization.
Before we dive into the installation steps, let’s briefly understand what Proxmox and virtual machines are, and why they are a powerful combination.
Proxmox Virtual Environment (VE) is an open-source server virtualization management solution. It’s a complete platform for enterprise virtualization that tightly integrates KVM hypervisor and LXC containers, software-defined storage, and networking functionality on a single platform. This means you can run both traditional virtual machines (like our Ubuntu VM) and lightweight containers from a single web-based interface. Proxmox is known for its ease of use, robust features, and active community support, making it a popular choice for both small-scale home labs and large data centers.
A virtual machine (VM) is a virtualized computer system that runs on a physical host machine. Think of it as a computer within a computer. Each VM operates as an independent system, complete with its own virtual hardware (CPU, RAM, storage, network interfaces) and operating system. This isolation allows you to run multiple different operating systems simultaneously on a single physical server without them interfering with each other. For example, you could have a Windows VM, an Ubuntu VM, and a CentOS VM all running on the same Proxmox server. This flexibility is incredibly useful for testing new software, creating isolated development environments, or consolidating multiple physical servers into one.
Now that we understand the basics, let’s get our hands dirty and install an Ubuntu virtual machine on your Proxmox server. For this guide, we’ll assume you have Proxmox VE already installed and accessible via its web interface.
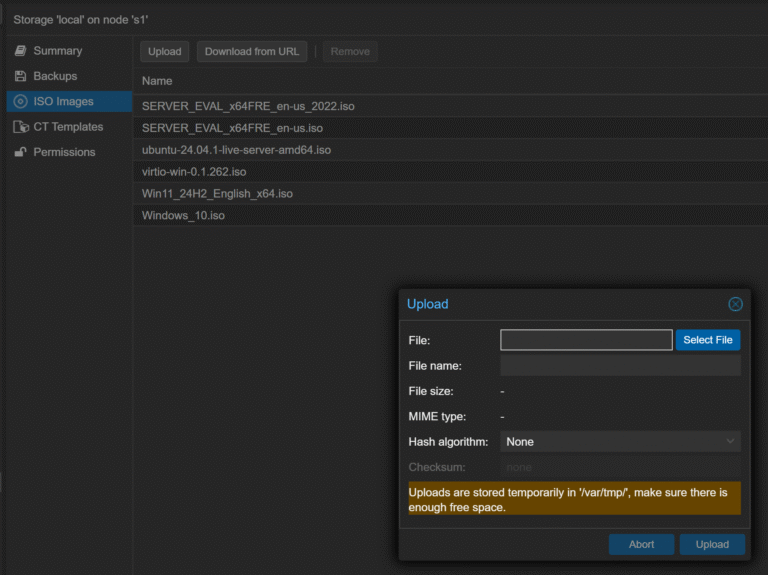
First, you’ll need the Ubuntu Server ISO image. It’s recommended to download the latest LTS (Long Term Support) version for stability and long-term support. You can download it directly from the official Ubuntu website.
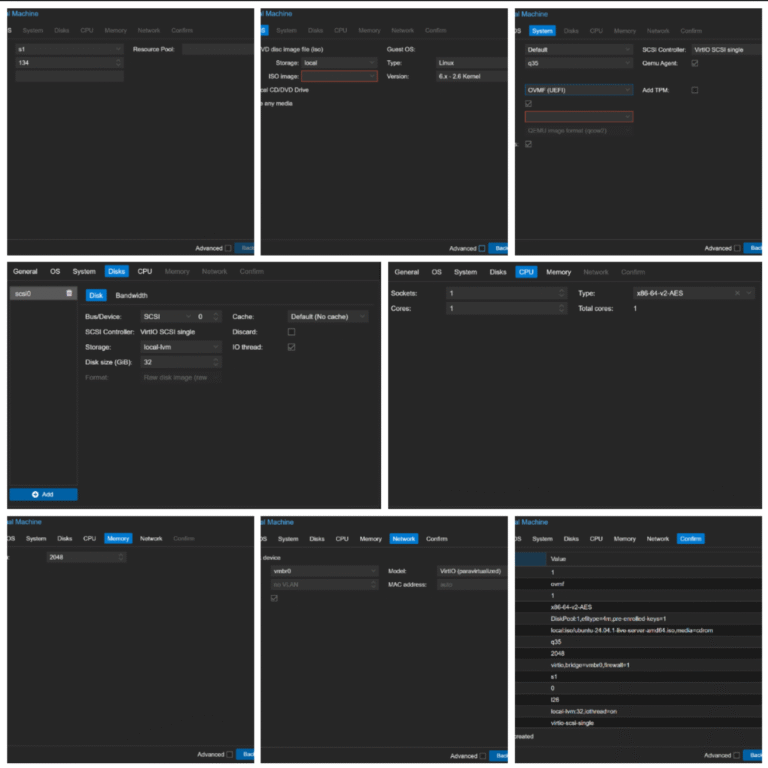
Now, let’s create the virtual machine that will host our Ubuntu installation.
Once the VM is created, it will boot from the Ubuntu ISO. Now, you’ll proceed with the standard Ubuntu installation process.
4. Once the installation is finished, you’ll be prompted to reboot. Before rebooting, go back to the Hardware section of your VM in Proxmox, select the CD/DVD Drive, and click Remove to unmount the ISO. This prevents the VM from booting back into the installer.
5. Reboot the VM from the console.
After Ubuntu is installed and your VM reboots, you can access it via the Proxmox console or, if you installed OpenSSH, via SSH from your local machine.
Your Ubuntu VM is now up and running on Proxmox! You can now use it for your projects, whether it’s hosting a website, running a database, or serving as a development environment.
Installing an Ubuntu virtual machine in Proxmox is a straightforward process that unlocks a world of possibilities for virtualization. By following this guide, you’ve successfully set up a robust and flexible environment for your computing needs. Whether you’re a seasoned IT professional or a curious home lab enthusiast, mastering VM creation in Proxmox is a valuable skill that enhances your ability to manage resources, test applications, and build resilient server infrastructures.