

The AI Infrastructure Boom: From Nokia’s $4B US Bet to Foxconn’s Supercomputer Cluster
November 23, 2025
EU Digital Omnibus: Is Europe Quietly Dialling Back Data and AI Rules?
December 9, 2025
When my Proxmox Ceph cluster went into HEALTH_WARN and three OSDs crashed, every virtual machine in my lab was at risk. Only one OSD was still holding all the data. If that single disk died, everything would have gone with it.
This article explains, how I:
It’s a simple, real-world Ceph OSD recovery story that should help anyone running Proxmox with Ceph storage.
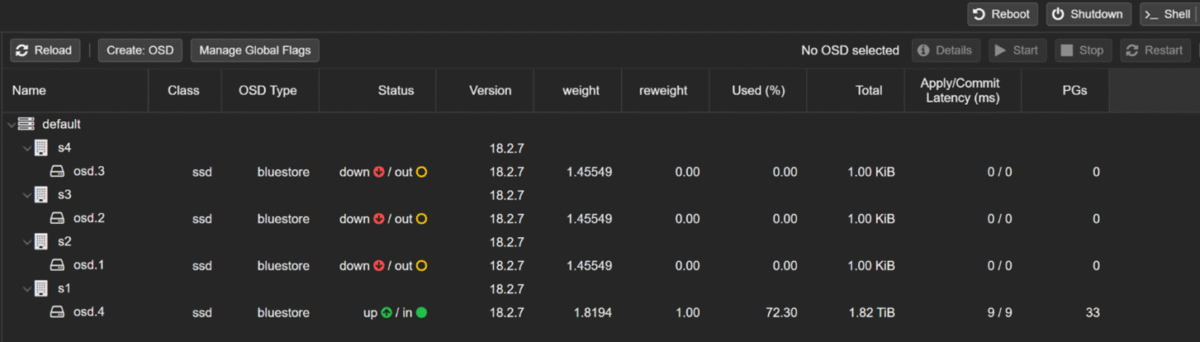
My starting point looked like this:
ceph -s
In other words:
For Ceph newbies, the important terms are:
I was running DiskPool size 1 / min_size 1, so the cluster was “working” but one more disk failure would have meant complete data loss.
Always make sure you have good backups before doing any Ceph surgery.
ceph osd out <id>
ceph osd crush remove osd.<id>
ceph auth del osd.<id>
ceph osd rm <id>
systemctl stop ceph-osd@<id>
This tells Ceph:
These OSDs are gone. Stop trying to use them.
On lsblk I could still see the OSD block devices (for example /dev/sdb mapped to a Ceph LV), but they were now free to be re-used.
On each node (s2, s3, s4), I created a brand-new OSD using ceph-volume:
ceph-volume lvm create –data /dev/sdb
Ceph did the following automatically:
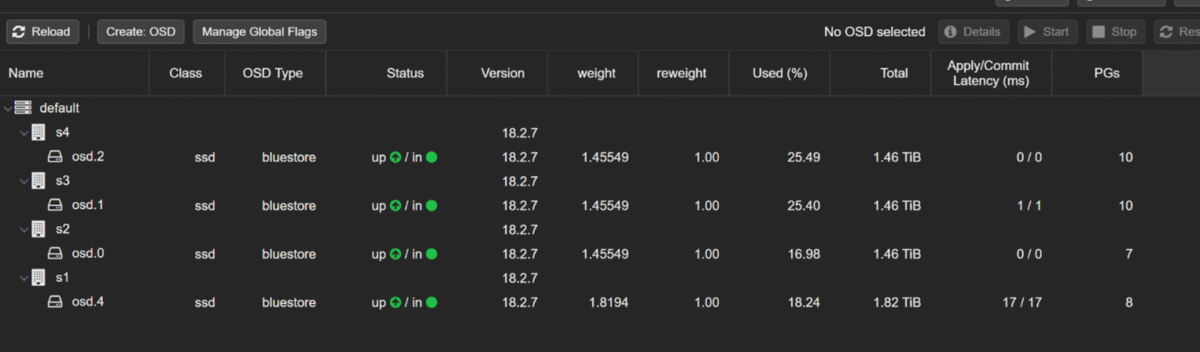
After doing this on all three nodes, my ceph osd tree looked like:
ceph osd tree
4 OSDs: osd.0, osd.1, osd.2, osd.4
All up and in
Earlier, I had set some safety flags during the disaster:
Once the fresh OSDs were ready, I removed those flags:
ceph osd unset noout
ceph osd unset nobackfill
ceph osd unset norecover
Ceph immediately started backfilling and remapping PGs to spread data from the full OSD to the new ones. During this time, ceph -s showed:
I just let it run. Depending on your network and disk speed, this can take hours.
Once everything was stable and all OSDs were up, I changed the pool replication:
This did two important things:
This protects you from silent “single copy” mode. If one OSD disappears, Ceph will complain loudly instead of quietly running with no redundancy.
After the rebalancing finished, my final ceph -s looked like:
health: HEALTH_OK
osd: 4 osds: 4 up, 4 in
pools: 33 pgs
pgs: 33 active+clean
And:
ceph osd pool ls detail | grep -A3 DiskPool
pool 2 'DiskPool' replicated size 2 min_size 2 ...
Now every VM disk stored on DiskPool has two copies on different OSDs.
Key Lessons for Anyone Running Proxmox and Ceph
By rebuilding the failed OSDs and increasing the pool size to 2, my Proxmox Ceph storage moved from “one disk away from disaster” to a proper redundant Ceph cluster.